Millinery: The Art of The Hat and Bonnet
While dress-making was a time-consuming task most wealthy young ladies left to seamstresses and maids, the finer art of millinery was something to be enjoyed by both the upper-class and lower-class. It did not take as long to "trim a bonnet" as it did to make a dress, nor was dressing one's headgear as expensive as buying a new wardrobe. It was a pleasant past-time for many a well-to-do young woman, who often found herself with nothing to do after music and deportment lessons were over, especially since reading was not something young ladies were encouraged to do.
Click here for a visual chronology of the different kinds of headgear worn around the 18th century.
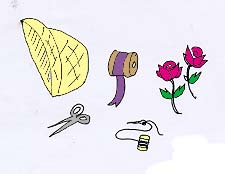
Here's a simple visual overview of how to trim a bonnet:
Prepare the tools you need to trim the hat: a sharp pair of scissors, a good length of ribbon in a color that complements the hat's, and one or some of the following: plumes of feathers, dried flowers from hot-house cuttings, or artificial ones.
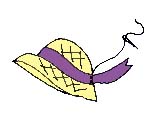 Position the ribbon
around the base of the crown (rising part of the hat.) Use fine pins to keep
the ribbon in place while the ribbon is being sewn into place. The seam should
be fine enough to hold the ribbon to the hat without becoming involuntarily
loose, but not so finely-stitched that it would be impossible to remove the
ribbon, should you one day tire of its trimmings and wish to replace them.
Position the ribbon
around the base of the crown (rising part of the hat.) Use fine pins to keep
the ribbon in place while the ribbon is being sewn into place. The seam should
be fine enough to hold the ribbon to the hat without becoming involuntarily
loose, but not so finely-stitched that it would be impossible to remove the
ribbon, should you one day tire of its trimmings and wish to replace them.
 Once the band is
firmly sewn in place, one can insert dried or silk flowers between the ribbon-band
and the hat. Using another fine needle, sew the stems of the flowers securely
so that they do not fall off with any awkward motion. Use another length of
the band to make a ribbon that can hide the stitching you have done.
Once the band is
firmly sewn in place, one can insert dried or silk flowers between the ribbon-band
and the hat. Using another fine needle, sew the stems of the flowers securely
so that they do not fall off with any awkward motion. Use another length of
the band to make a ribbon that can hide the stitching you have done.
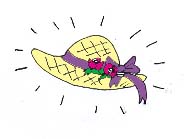
The end result will be done sooner than you think!