Creating Text Tracks
in Quicktime
The process of creating text tracks
-- subtitles -- for videos in Quicktime involves several steps. It begins with
transcribing and inputting "time codes" for the video (i .e. times
that indicate when a piece of transcript should be displayed) and ends with
a self-contained Quicktime movie that integrates the text track with the video
and audio. There will be two important products from this process: One, of course,
is the subtitled Quicktime movie; the other is a text document (.txt) that contains
all the information about the text track -- what, when, and how it is to be
displayed. The latter file is important because it will allow for revisions
and can be used for other purposes in the future.
- Time-coding
videos
- Creating
a text track .txt document
- Importing
a text track .txt document into Quicktime
- Adding
a text track to video/audio
I. Time-coding
videos
- Create a word document with a
two-column table.
- In the first column put the time
codes (more on this below). The
time codes should be formatted as ab:cd:ef.gh
where
--
"ab" is the elapsed hours count
"cd" is the minutes count
"ef" is the seconds count
"gh" is the frames count
NOTE:
There are colons between each of the counts EXCEPT there is a period between
the seconds count and the frames count
- In the second column, put the
utterances of the people speaking. We tend to format ours as <speaker>:
<things said>
(e.g. Ball: What do other people think about that?).
Word
of advice: Don't put too many words in a single cell -- otherwise the black
subtitle box will be huge, covering up a large region of the video.
- For
large room presentations: The specifications we use for the subtitle
fonts allow for 115 characters in a single subtitle blurb (at most).
- For
small room presentations: Our specifications allow for a maximum
of 150 characters to be used.
- After completing the time codes
and utterances for the video segment, create one more row
at the end of the table with the movie duration entered into the
first column where the time code usually goes.
* * * * * * * * *
*
Working
with Quicktime Time Codes
- Open your Quicktime movie
- Select "Get info" under
the "Window" menu (or type command-i); a window similar to the one
below, should appear:
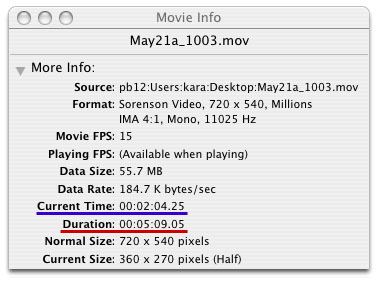
- The "Current Time,"
highlighted with blue underline, is the time code that accompanies the utterances;
the "Duration," highlighted with red underline, is the time needed
for the last row of the Word document (see step 2 of the instructions
for "Time-coding videos").
Navigation
Tips in Quicktime:
- To
jump to a specific point in the movie, drag the playback head (the small black
triangle) in the timeline.

- To
step through frame-by-frame, press the Right and Left Arrow keys on your keyboard
(NOTE: If this doesn't work, first click the small black triangle in the timeline).
- Other
control buttons include: fast forward
 ,
rewind
,
rewind  ,
jump to start (of movie)
,
jump to start (of movie)  ,
and jump to end (of movie)
,
and jump to end (of movie) 
- In
addition to the play button
 ,
the movie can also be paused and restarted by tapping the space bar.
,
the movie can also be paused and restarted by tapping the space bar.
II.
Creating a text track .txt document
III.
Importing a text track .txt document into Quicktime
- Open Quicktime
- Choose "Import..." under
the File menu
- From within the Import dialog
box, navigate to the text track .txt document and click on the "Open"
button
A Quicktime text track movie
will be opened -- and, unless it has been customized to have a special appearance,
the text track movie will have a black background and white text
IV.
Adding a Quicktime text track to a Quicktime video
- If it is not already open, open
the text track movie -- otherwise, if it is opened, click on the text track
movie to make it the active window.
- Under the "Edit" menu,
select ""Select All"
- Under the "Edit" menu,
select "Copy"
- Open the video movie (if it is
already open, click on it to make it the active window)
- Under the "Edit" menu,
select "Select All"
- Under the "Edit" menu,
select "Add Scaled"
- Under the "Movie" menu,
select "Get Movies Properties"
- Click on the word "Movie"
in the upper left of the window to display a menu of options: choose Text
Track
- Click on the word "Annotations"
in the upper left of the window to display a menu of options: choose Size
- Click on the "Adjust"
button: Red marks will appear on the video, surrounding the text track.
- Click and hold somewhere within
the boundaries of the red marks but do NOT actually click on the
red marks; then drag the text track to the place where you like it positioned.
NOTE:
If you hold down the shift key (mac) while dragging, the text track will move
straight down; you can also use the Up and Down arrows on your keyboard to nudge
the text track up or down pixel-by-pixel
- Return to the "Get Movies
Properties" window and click on the "Done" button.
- Under the File Menu, select "Save
as..."
- Give the new file a name, choose
a location to save the file and MAKE SURE to choose the "Make movie self
contained" option