
A few weeks back (February, 2006) I sent out an image I took of M42, along with a short description of how the image was made. Several club members e-mailed me to so they they were impressed with the image, and mildly annoyed that I hadn’t saved the “making of” bit for the club newsletter. Reading this, It occured to me that I had kept the “making of” short and sweet for the benefit of the non-astronomers on my mailing list, but I could do something a lot more detailed for the club newsletter. And so here it is, the original text plus the special extended “making of” featurette.
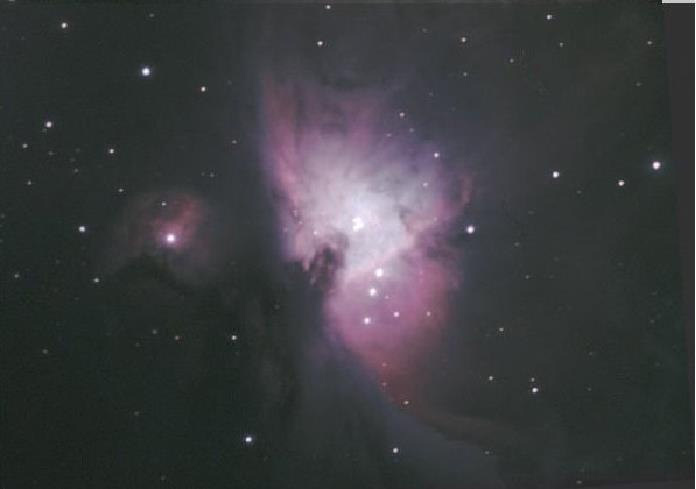
To the naked eye, M42 looks like a fuzzy star on Orion’s sword. Through a small telescope, it begins to look like my picture, although it is difficult to see color because of the low brightness level (we are all effectively colorblind at low light levels). The object is described by astronomers as a huge star-forming region or “stellar nursery,” where a huge cloud of stellar gas is condensing to form hundreds of new stars (including the ones visible in the image). Much higher resolution images taken from the Hubble telescope additionally show disks of dust and gas called “propolyds” forming around many of these new stars; these are believed to be embryonic solar systems. The object is believed to be about 1,600 Light years distant and about 30 Light Years across, and covers an area of sky about the size of the full moon (only the core is visible to the naked eye). It glows rose red due to ultraviolet light given off by the new stars causing surrounding hydrogen gas to Fluoresce (that rose red color is called the Hydrogen H-Alpha line).
My Camera is called an AtiK 2HS, from Atik instruments in Portugal ( http://www.atik-instruments.com/ ), sold in the US by Adirondack Video Astronomy ( http://www.astrovid.com/ ). It is essentially a Phillips “ToUCam” webcam which has been modified to allow it to take long exposure images, which is not possible using an unmodified webcam (in essence, it is modified so that your computer’s parallel port can drive the CCDs (Charge Coupled Device—the light sensor array chip which forms the heart of the camera) internal timing, replacing the existing circuitry). They have also added a cooling fan, and replaced the 1/4” color CCD sensor chip with a 1/3” monochrome chip. Monochrome chips are inherently more light sensitive then comparable color chips (and can still be used to take color images, as will be described later), and the larger chip area makes for a larger field of view (also discussed later). The camera has a resolution of 640x480.
Overall I think it is pretty comparable to the Meade DSI pro (which was not available at the time I purchased the 2HS), although the Meade was designed specifically for Astrophotography—it is not a modified webcam.

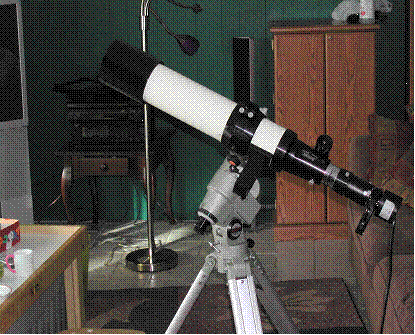
All of my images are taken with a mid-1980’s vintage Televue Genesis Refractor (“Jenna”). The Objective lens is 4” in diameter, and it has an effective focal length of 20”. It has four internal lenses, three made from glass and (I believe) one cut from Flourite crystal. It was designed by Al Nagler (who still returns phone calls), and built at his small factory in Pearl River, New York. It is shown with CCD camera and RGB filter wheel mounted.
In CCD photography, your telescope’s objective basically is used like a camera lens, focusing light gathered from the object being imaged directly onto the CCD chip. There are normally no intermediate lenses (although Barlows and Focal Reducers can be used), and hence the distance from the objective to the chip surface should exactly equal the focal length of the object lens or mirror. The magnification, or more appropriately the field of view, depends only on the size of the chip surface and the focal length of the telescope. The specific relationship (with due apologies to the mathematically impaired) is:
S = 3438 * D / F
Where S is field of view in Arc Minutes, D is the chip diameter in millimeters, and F is the scope’s focal length in millimeters. So, for example, the chip in my 2HS is about 4.4 mm wide by 3.3mm high and my Genesis has a focal length of 500 mm, giving a field of view of about 30 by 22 arc minutes, roughly the size of the full moon. My 10” F/6 Dob has a 1500mm focal length, giving it a FOV of about 10 by 7 Arc minutes, which is fine for planetary work, but too small for deep sky work. It’s also important to notice that with a long focal length and small detector, the great majority of photons collected by your Objective lens or mirror are just going to whiz right by the sensor chip, essentially completely wasted. A Photon is a terrible thing to waste, especially if it’s traveled thousands of light-years. The full moon has an area of about 700 square Arc Minutes, but only 10% of this would fall on the CCD chip if imaged in my Dob (compared to about 90% if the moon were imaged on the Genesis). The rest of the light collected is wasted. The big take away here is that for photographing extended objects, short focal length beats big aperture. The “Focal Ratio” of a scope is simply it’s focal length divided by its aperture (i.e., objective diameter), And the lower the focal ratio the more photons the scope will collect in a given span of time (hence the term “fast” for scopes around F5 or lower, and “slow” for scopes with higher ratios). A scope with a focal ratio of F5 (like my Genesis) will collect photons about twice as fast (assuming a uniformly illuminated field) as an F7 scope, regardless of how small the F5 is and how big the F7 is (specifically, the rate is inversely proportional to the Focal Ratio squared). Many of the best Wide Field images are taken with objectives on the order of 60 to 80 mm, much too small for visual deep sky work. And scopes we would traditionally use for visual deep sky imaging (i.e., big Dobs) are usually poorly suited to deep sky imaging because of their long focal lengths (somewhat surprisingly, they may be better suited to planetary imaging).
To easily determine the FOV for an arbitrary camera/telescope pair, download the Ron Wodaski’s freeware program CCDCALC.exe (available from the Adirondack Video Astronomy Site http://www.astrovid.com/ccd_calc.php ).
In the paragraph above, I stated that the correct distance from the objective lens/mirror to the CCD chip in the camera (again, in the absence of a Barlow or Focal Reducer) should precisely equal the scope’s focal length. In practice, precise focus is extremely critical to taking sharp images, and is particularly difficult to achieve on faster scopes (which are more sensitive to minute changes to focus position—see, for example, Ron Wodaski’s book “the New CCD Astronomy” if your wondering why). Standard rack and pinion focusers are not precise enough for doing photographic work on scopes below about F7. I currently use a “Feathertouch” dual-speed manual focuser from Starlight instruments which works very well, I have also used (and recommend) the JMI “Motofocus” units ( http://www.jimsmobile.com/ ). The Motofocus allows entirely hands off (and hence vibration-free) focusing, but the Feather Touch is more compact and won’t add to the maze of wires and hand controllers your likely to have anyway.
I also use a gadget called a “Kwik-Focus” from Kendrick ( http://www.kendrickastro.com/astro/kwikfocus.html ) which is just a commercial adaptation of something called a “Hartmann Mask,” which has been around for a long time. All it is is a piece of plastic with three large holes that covers the front of the telescope. With the mask in place, each star will split into three images unless focus is virtually perfect. This is a huge help for accurate fine focusing.
Of course, remember to take the mask off once the scope is focused.
You could also easily make something similar out of a sheet of cardboard and taping it to the front of the scope, precisely cut holes don’t make it work any better! (Remember the old 35 mm camera where you would see two images that merged into one when the camera was correctly focused?).
As I said, my 2HS is a monochrome camera. To image in color requires taking separate images through red, green and blue color filters, then merging them afterward using software (programs like Photoshop and Paintshop have facilities to do this, but I like “Registar” from Auriga Imaging because it can align the three frames automatically ( http://www.aurigaimaging.com/ ). Regrettably, you need to use the expensive “Dichronic” filters (available from Adirondack Video Astronomy, for example), simple colored glass isn’t specific enough. My filters are mounted in a filter wheel, which allows me to switch filters with minimal disturbance to the scope and camera. Any significant jolt while switching filters will require re-centering the target.
I have found it is necessary to refocus slightly (less then 1mm) after flipping filters, which presumably implies my scope has a very small (but not quite negligible) amount of chromatic aberration (blue light focusing at a shorter distance the red, a common problem in short focus refractors). When taking images in “white” light I actually often use a light yellow filter to reduce the effects of CA. I always use an IR-blocking filter; CCD chips (unlike our eyes) are very sensitive to near-infrared light but I don’t think any refractor will focus Visible and Infrared together correctly.
I use the venerable Vixen Polaris mount, which works well as long as I take the time to Polar Align it properly. I almost never take “subframes” over 60 seconds in length, which helps reduce the impact of tracking and periodic error.
According to Ron Wadoski’s book, the most important part of an Astrophotography setup is the mounting. I you have a so-so telescope and camera, but your mounting can keep an object well centered for an hour or more, you can still take great Astrophotographs. If you have a great camera and scope but your mount can’t keep anything centered for more then a few minutes, you better stick to Lunar photography. It’s also worth noting that the importance of accurate tracking goes up with both the length of the exposure and the focal length of the telescope. Long focus scopes will effectively magnify tracking errors more then short focus scopes because of the larger image they produce on the CCD chip (see optics discussion above).
“Shooting M42: Part 2, An Introduction to Digital Deep-Sky Photography” appeared in the June 2006 Issue of this Newsletter. It deals with the software and processing of the image.