What
the heck is a Lightholder bucket? Sounds kinda like a light bucket, which is s
slang-ish term for a large Dob, which is a slang-ish
term for a large Dobsonian telescope, the ubiquitous alt-azimuth mounted Newtonian
reflector. But what in the world is a Lightholder
bucket?
I’ll
explain that a little later. First we have to go back to “the beginning”. No, not that far back,
just about three years ago, to the 2008 Black Forest Star Party. I vowed
to myself as I was packing up to leave for home that that would be the last
star party for Papa Smurf, my 1980’s vintage 13-inch Dob. Its design is rather
dated, with a solid tube, and after using it for nearly 25 years, it had seemed
to have put on weight. Having downsized my transport vehicle, it seemed also to
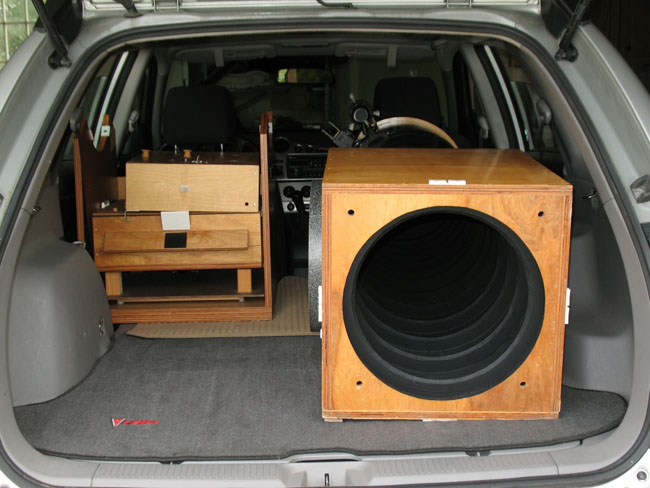
take up more and more cargo room in the back of the car. It’s
fine for running back and forth to local sites for the evening, but not for
longer camping trips such as the BFSP. Besides all the usual paraphernalia such
as tracking platform, eyepiece case, equipment cases, chair, star charts, and
whatnot, I also need to carry camping gear, sleeping bag, pillow, clothes,
food, and so on. It is a very real challenge trying to make room for
everything.
Papa Smurf takes up
about two thirds of the floor space in the back of my
While
Papa Smurf really isn’t much heavier than it was 25 years ago (could it be that
I’m simply getting less tolerant of lugging the beast around? – nah!), the
amount of cargo room it occupies in the back of the car is indeed a real
problem. I resolved in 2008 that it would be replaced within the year with a
modern, more portable, truss-tube design. It might be a rebuild with the same
13 inch optics, or it might be a whole new (presumably bigger) scope. But it
would have to be lighter, and it would absolutely have to present a smaller footprint in the back of the car when
transported.
Well,
I’ve never been accused of putting a plan into action too quickly (just ask my
wife Debi), so it’s just now that I’m well on my way to completing the project.
But let’s go back again. My first thought was to rebuild the 13 inch. But the
more I thought about it the less enthusiastic I was about that option. After
all, it would be essentially the same scope, regardless of the design. Having
used it since 1984, I thought I was ready for something new. And of course,
when it comes to Dobs, most would agree that “new” means “bigger”. But how much bigger? I’ve always thought a 14.5” is the
ideal size, as even at moderately fast focal ratios around f/4.5, most folks
can stand on the ground and still see into the eyepiece when the scope is
pointed to the zenith. But 14.5 inches is barely more
than 13, so that’s not a big enough jump. I reasoned that an 18 inch would be
enough bigger to be noticeable at the eyepiece. And I wasn’t really interested
in anything bigger than that because the price starts to get prohibitive and
the overall weight and dimensions start becoming unmanageable. I’m not getting
any younger, you know. So I had been looking at mirrors off and on, in the
17.5-18 inch range. But the amount of money that a good one would cost scared
me a little, and I never quite pulled the trigger. Then in the spring of 2010,
the new scope bug bit me again, and I started looking at mirrors on AstroMart.
Not much in the way of 18-inchers were available, but I came across a 16” f/4.6
that sounded really, really nice.
Now
16 inches isn’t that much larger than 13, but the surface area is about 50%
more, about half a magnitude’s worth. And if the mirror has a good figure, the
additional sharpness compared to my 13 inch (which really isn’t all that good)
should provide somewhat better images. And I’m comfortable with the dimensions
of the scope. Not as big as an 18, but 16 inches of aperture is still considered
a “big” Dob, albeit the smallest of that class. It
will be significantly lighter than Papa Smurf, and it’s footprint in the back
of the car will definitely be smaller too.
So
I contacted the mirror’s seller, and asked for numbers on the mirror. He sent
me numbers. They were good numbers. No, they were really good numbers. Almost too good to be true
numbers. So I contacted him again, asking for a bio, what his experience
was in mirror making, etc. He sent me a lot of information on what his
credentials are, and why I should trust him. And trust him I did. I know a
little bit about what it takes to make a good mirror, and he didn’t blow any
smoke. Just factual information that convinced me that I
would be making a good purchase.
And
a good purchase it proved to be. After receiving the mirror I put it on the
test stand and took my own knife-edge measurements. I obtained essentially the
same numbers as he quoted me. Like I said, they are really good numbers. The
mirror’s figure is nearly a straight line through the middle of the
Millies-LaCroix tornado. It is easily better than 1/10 wave peak-to-valley,
which is about as much as anyone should say based on Foucault measurements. The
edge looks better than any of the mirrors I’ve made. Nice, smooth figure. For
those of you who have no idea what I’m talking about, the bottom line is that after
bench testing it appears to be for all intents and purposes a perfect mirror.
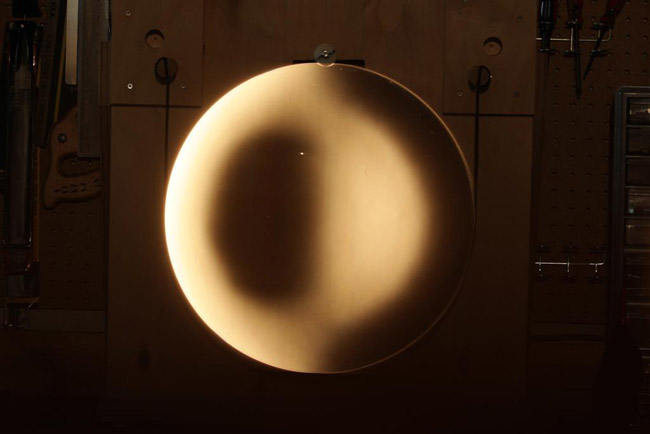
Mmmmm… doughnut! The
primary mirror’s figure is very smooth – and very nearly perfect! Notice the
brightly lit ring on the right side of the mirror – that indicates a very sharp
(i.e., not turned down) edge. (The missing part of the diffraction ring on the
right side is an artifact of how I photographed the mirror using the Foucault
tester. Visually the ring extended evenly all the way around.)
Now
that I had a mirror, I had another choice to make. Should I build the scope
from scratch, or build it from a kit? I went back and forth several times, and
finally came down on the side of building it from a kit. Specifically,
an AstroSystems TeleKit. I did a lot of searching on AstroMart and
Cloudy Nights forums looking for opinions and reviews of the TeleKit and
virtually all such write-ups were positive. The common theme was a sturdy,
attractive, and functional telescope. And after looking at everything that came
with the standard kit, I would be hard-pressed to build one from scratch for less
money. I also imagined that building from scratch would require a lot more time
on my part and certainly more trial and error. In the end it was a slam-dunk,
really.
I
didn’t receive the kit until around Christmas time 2010, so while I haven’t had
a lot of free time to work on it I’m finding enough to make steady progress on
it. I was planning on doing a step-by-step article on what I’ve done so far,
but instead I’ll just hit a couple highlights here and refer you to an online
photo album where I can go into more detail.
First
off, AstroSystems does a really good job of packing and shipping the kit. Mine
arrived in four large boxes, plus a fifth package that contained the truss
tubes. Everything was very well packed, with nothing damaged. And it all arrived
about when he said it would, with their lead time being about 2-3 months.
All
of the wood parts, all Baltic Birch plywood, are beautiful! They’re all CNC
machined, including all the finger joints, and virtually all holes are
pre-drilled. There’s very little carpentry work to do other than gluing,
clamping, and assembly. Everything fit perfectly the first time,
I didn’t have to do any sanding or trimming to make things fit correctly. And
the finish is very good - only a light sanding is needed before applying wood finish.
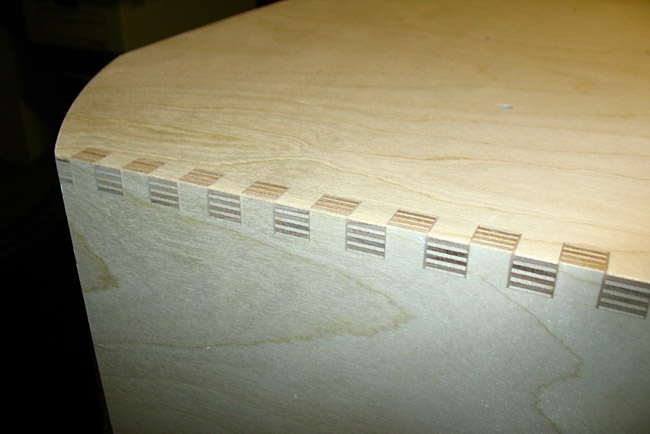
The finger joints are
a hallmark of TeleKits. Besides being very attractive, they are really strong!
The wood will break before the joint does.
Now
I will say that while not essential, prior experience with woodworking is a big
plus. There’s a lot of gluing and clamping and squaring to do. All of the large
wood structures (mirror box, rocker box, and upper cage) are held together with
epoxy (supplied with the kit), so experience with using epoxies helps too. But
if you are careful, and neat, you will end up with structures that are
beautiful to look at and nearly indestructible. And with very
little exposed hardware.
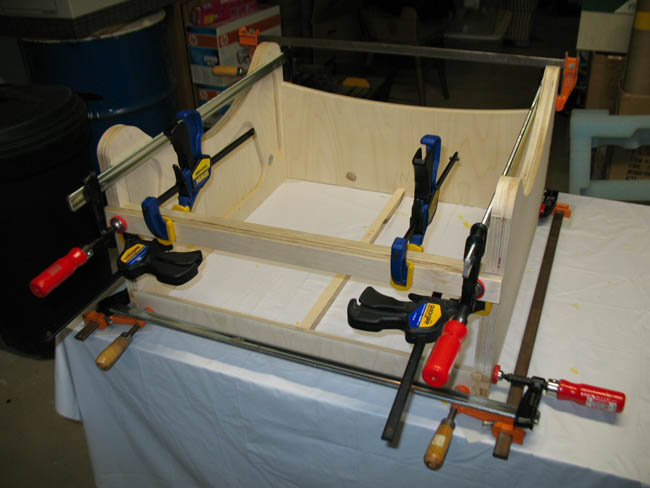
As you can see you
need to do a fair amount of clamping and squaring during assembly. Taking your
time here will pay dividends with a structurally sound and stable telescope
later.
The
instruction booklet is very detailed, but sometimes does not match the kit. I
think the kit design has evolved over the years but the instruction booklet has
not kept up. Not to worry, a call to Randy or Alan at AstroSystems will clear
up any questions you have. I modified a few items while building, to suit my persnickety
personality. But that’s the beauty of building a scope yourself, even from a
kit. The kit provides the baseline, but you can change things you don’t like or
add things you deem to be missing. This makes it your scope, with your own
personality.
So
where does the scope stand now? Right now I’m in the middle of applying the
polyurethane to all the wood sub-assemblies. The instructions are broken up
into building this sub-component, e.g., the upper cage, finishing it, then
doing its final assembly. Then they move you on to the next sub-component, say,
the mirror box, build it, finish it, and so on, until you’ve built everything.
But I didn’t want to be applying polyurethane in the house in the winter – my
family and I really didn’t want to be breathing all those vapors. So I’ve built
each sub-assembly enough to get a working scope put together for very basic
focus testing. And now that I’ve verified that the scope will actually work,
it’s all disassembled and I’m in the middle of applying the finish to all the
wood parts out in the garage. Once that’s done, I can do all the final assembly
work. I’m hoping I can have it done by the end of summer, in time for a
late-August star party. But I’m not promising anything.
So finally, back to the original question. What is a Lightholder bucket? Well, the name
of the mirror maker is John Lightholder. It turns out that he is gaining quite
a reputation for making really good mirrors. What a great name for a mirror
maker! I wonder if he had it changed because of his profession. Probably not, so how serendipitous for him. For now, I’m
calling the scope the Lightholder Bucket. When it is done, I’ll give it a
“real” name. But I won’t reveal that until it is finished. Stay tuned.
For
a photo album showing my progress so far, and some of my
modifications/additions, check out my online photo album at: https://plus.google.com/photos/111032310141460224074/albums/5617854692496249889?authkey=CPX9uOuHhY7m1QE
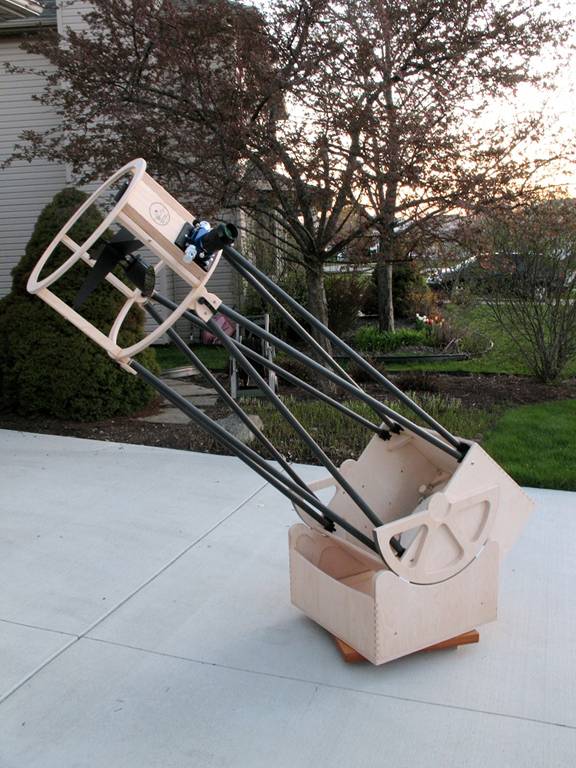
Here’s the scope completed enough to ensure
that my eyepieces all come to a focus – and they do! Now it’s time for
finishing and final assembly.